








Interactive Classroom

Sign up and Log in
On or before your start date, you will receive an email from the platform inviting you to set up your account. Look for the subject line You’ve been invited to Interactive Classroom. That is where you will find the activation link to finishing setting up login credentials.
If you don’t initially see this email in your inbox, check your spam folder.
Once your district admins have finalized Interactive Classroom SSO set up, navigate to http://my.openupresources.org/ and click either:
- Sign-in with Clever
- Sign-in with ClassLink
Sign in with Edlink [coming soon]
Navigate the Platform
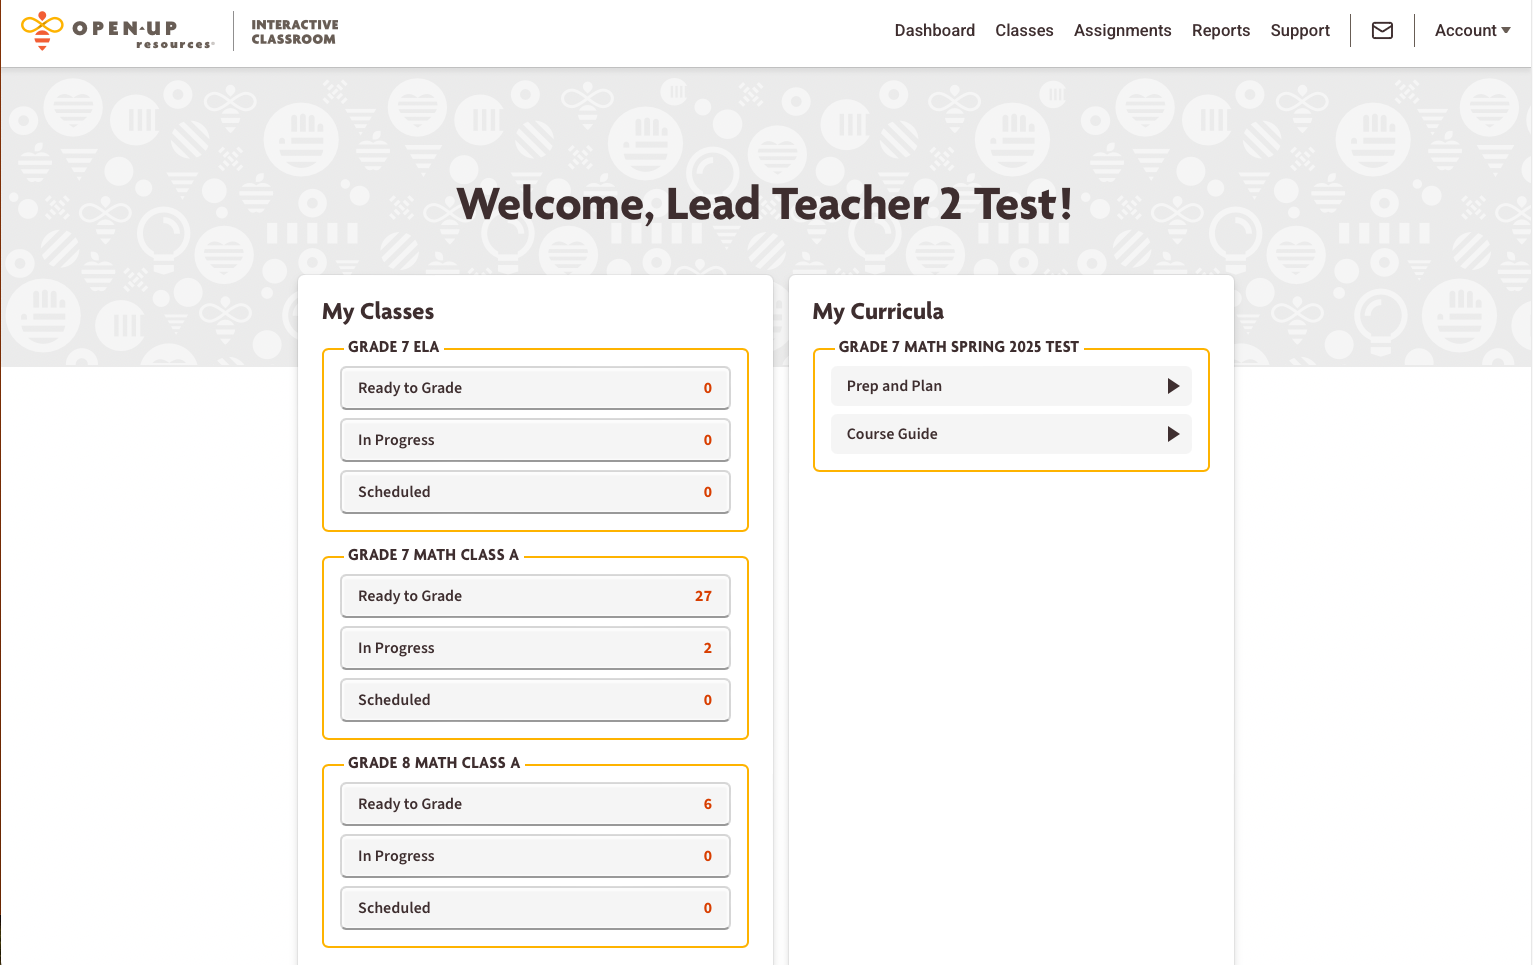
Upon logging in, you’ll be taken to your Dashboard, the central hub for all your activities.
- My Classes: On the left side, you can see all of your classes. This section helps teachers manage assignments from scheduled to ready to grade.
- My Curricula: On the right side, you’ll see your courses. This section provides quick access to curriculum materials for planning and preparation.
Here you can see all of your classes. You can quickly navigate to the courses assigned to each class, assignments, the class roster, and class settings.

View a full detailed list of assignments across classes. Sort assignments by class, date range, assigned status, and more.View by status such as Assigned, Started by Students, Ready to Grade, and Graded.

Peak into powerful insights into student progress. Reports can be viewed by course content or by standards.

Under the Accounts drop down you will find Settings, Archived Classes and the Log out option.
Class Set Up and Rostering
Rostering happens in your SSO platform. After your admin sets up integration with your SSO and Interactive Classroom, class and rostering data syncs – pulling that over to your Interactive Classroom account. When logging in for the first time, classes will be populated already.
Your SSO and Interactive Classroom sync daily so that changes made to the rosters or classes appear no later than the next day.
- Create a Class
- On your Dashboard or in the Classes section, select the +Add/Join Class button in the top right corner. Select + Add New Class and fill out the class name, start and end dates.
- Add students: On the class tile, select the Roster link. Students can be added in two ways:
- Using the +Add New Student button, manually set up their login credentials (username/email, password, etc.).
- Are your students tech savvy? Send the student the Access Code that appears in the right panel. The student can then go to http://my.openupresources.org/ and use this code to sign up and get straight into your class.
- Add a Course to a Class
- Navigate to the Classes tab and click the Course link on a class.
- Click the + Add Course button in the top right corner.
- Select from the available courses the hit Save.
- Student added to the wrong class?
- As long as the student didn’t take assessments in the wrong class, you can remove them without losing their data in any other classes they were in.
- How to remove a class
- If no assignments have been assigned:
- Click Class Settings then select the Class Status drop down and choose Archived
- If assignments have not been assigned:
- Click Class settings and change the End Date to today. The class will archive over night.
- If no assignments have been assigned:
View Archived Classes: Click the Account drop down. Select Archived Classes.
- In the class roster, you’ll see a Co-Teacher Access Code that you can share with other teachers.
- Those co-teachers will then click + Add / Join Class on their class list page. In the pop up, select + Join Class then Save. They will be prompted to enter that Co-teacher Access code and Join. That class will now appear on their class list page.
- To remove any co-teacher, navigate the class roster and click the red X next to the co-teacher’s name.
Co-teachers have the same permission as lead teachers except:
- Co-teachers do not have access to Class Settings; Class name, Start date, End Date, Class status
- Co-teachers cannot remove other co-teachers from an existing class
Assigning & Assessments
- Select Prep and Plan from a course in your Curricula list. Navigate the unit and section your class is currently working on.
- Click Unit Assessments in the top right corner to access the assessment options.
- Click the Assign button.
- Enter the assignment details. The window that appears allows you to manage the assignment settings, assign the assessment to a particular class, individual student, or group, set due dates, add notes, and more.
- Click the Assign button in the bottom right corner of the window.

- Select Prep and Plan from a course in your Curricula list. Navigate the unit your class is currently working on.
- Browse through the content and select Practice Problems from the lesson. You can preview the assignment.
- Click the Assign button.
- Enter the assignment details. The window that appears allows you to manage the assignment settings, assign the element to a particular class, individual student, or group, set due dates, add notes, and more.
- Click the Assign button in the bottom right corner of the window.

- From your Dashboard, find the class you need, select In Progress.
- In the pop up, click the assignment you wish to edit.
- Click the Extend Access button and change to the desired date.
- Choose your new due date and click Save.
Accessibility & Accommodations
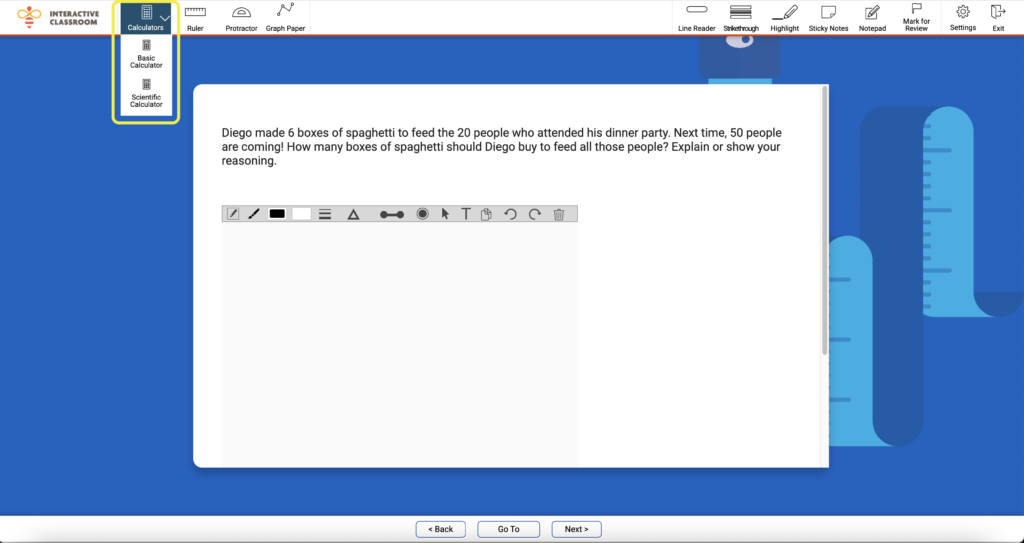
Students can access both a basic calculator and scientific calculator from the top menu bar while working on an assignment. These will only appear when appropriate — based on the lesson or unit. No need to manage them.
If teachers/students are using Google Chrome, they can translate pages in the dashboard (outside of assignables/lessons) using Chrome’s Translate feature in the browser.
- Click the three dots in the top right corner on the window.
- Select the translate feature towards the bottom of the list.
If students need translation on assignables or lessons, teachers can highlight the text they would like to translate, right click and select Translate Selection in [language].
Grading & Feedback
There are several ways to navigate to items ready to grade, here are two recommended ways:
- From your class list on the Dashboard, click Ready to Grade on the class tile.
- View all the assignments your students have completed that are ready to be graded.
- Click Grade Now next to the first assignment. This takes you into the gradebook for that specific task.
- Click the Assignments tab at the top of the Navigation Bar
- Select Ready to Grade
- Find the Assignment you’d like to grade
- Click Gradebook
In the Gradebook, you can toggle between the Summary view to preview the status of the assignment and the Details view to see individual question status.
- In the Details view, click the pencil icon in the Grade Column. (If you’re going back to review grades for an assignment that has already been scored, you can click the percentage in the Grade column as well.)
- Click Next > until you reach the first gradable item.
- In the grading tool on the right, input the grade you’d like to give each question or part of the question or hit Give Full Credit to easily give full credit.
- For multiple choice and multi-select questions, the system will automatically score them for you. But you always override the auto score if needed.
- You may also provide feedback to students in the Teacher Comments field.
- To see the correct answer click Teacher Notes, and to check Standards alignments, click the Alignments tab.
- Grading by Item or Student
- If you’d like to grade all of the answers for a particular question before moving to the next, click Next Student >.
- If you’d like to remain within a single student’s assignment, click Next Item >.
- Grade remaining questions.
- Autograding: Some questions will be autograded. We highly recommend that you double-check that these questions are scored appropriately, as students can make input errors that may cause the system to read a correct answer as incorrect.
- Once you have completed grading an assignment, your work is automatically saved. Press the X in the top right corner to return to your Gradebook.
Reports
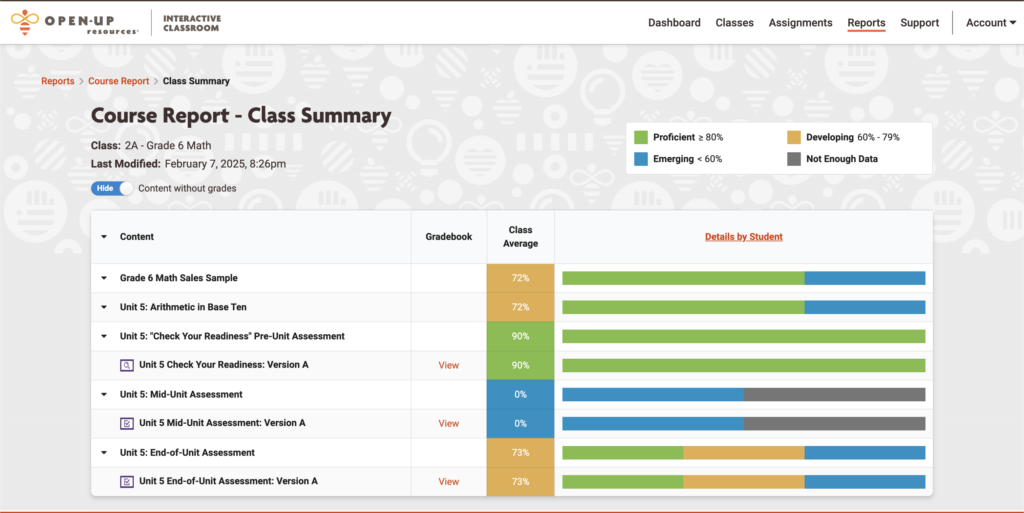
The Course Report allows you to track student progress within a specific course. As you begin grading assignments this report will begin to populate — usually within a few hours.
- At the top you’ll see an overall class summary — this gives snapshot of student progress across the course.
- Select Details by Student to dive deeper into each student’s performance across assignments.
- Dig into an individual students performance by click ing on their name.
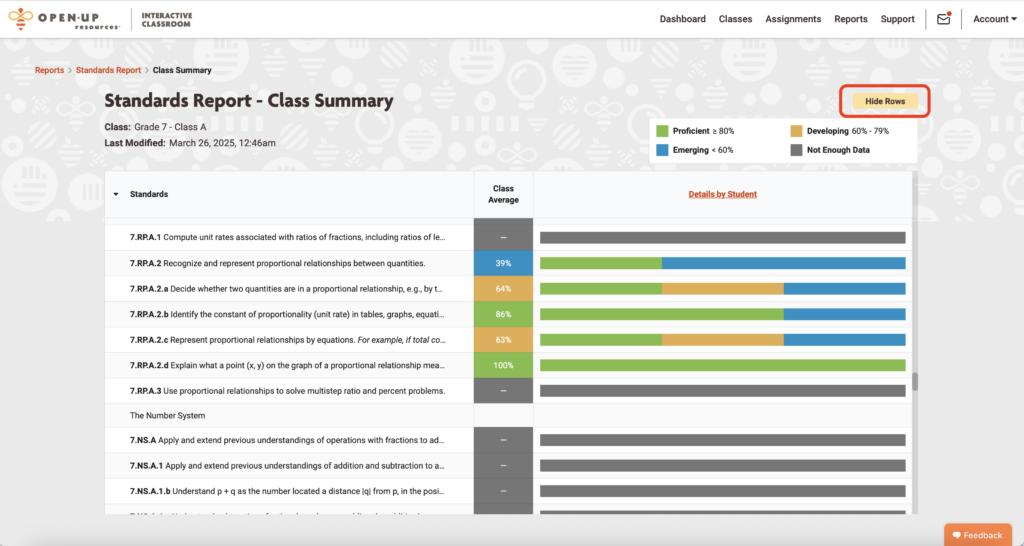
The Standards Report allows you to view student performance based on learning standards. As you assign and grade out more work, standards data will begin to populate — usually within. a few hours.
- Use the Hide Rows button in the top right to narrow down and see only preferred standards.
- Click Details by Student to drill down on the standards that have been assessed.
- Dig into an individual students performance by click ing on their name.
- Select a specific standard to show you how many assessment opportunities a student has had with that standard and how many remain.
Open multiple reports simultaneously:
- Hover over the tab in your browser.
- Right-click and select Duplicate page.
- Open the reports you need to view.
Note: Sandbox reports will not display real data. For a detailed walkthrough of report features, refer to the Report Book provided in your sales materials. If you do not have a report book, contact your sales representative.
Need further assistance?
For additional troubleshooting or Q&A support, contact us at ICSupport@openup.org.
